Production Deployment
Attention
This is a complex deployment process that requires advanced knowledge of Linux, Docker, Kubernetes, Helm, Terraform, AWS cloud infrastructure, Python-Django applications, and GitHub Actions. Consider using one of our recommended hosting partners, or a certified installation expert.
Note
Before beginning production deployment, you should have already installed your production AWS cloud infrastructure using the Smarter Official Terraform Modules.
Smarter runs natively on Kubernetes using spot-priced compute instances. This is a cost-effective, resilient, and scalable architecture that requires minimal maintenance once deployed. It natively handles multiple environments (alpha, beta, next, prod) for the same installation, maintaining clean separation of resources and data between environments. It also natively handles multiple installations of Smarter (ie multiple EKS clusters) within the same AWS account.
Production deployment involves the following steps:
Build AWS Infrastructure using the Smarter Official Terraform Modules.
Build and deploy the Smarter Chat ReactJS component to the CDN using Smarter Chat and Smarter Web Integration Example.
Deploy the Smarter Platform to your Kubernetes cluster using the Official Smarter Helm chart.
A modest amount of advance planning and an understanding of some basic organizational principles within Smarter will save you time and heartache. Smarter’s fundamental identification and organizational units are as follows:
root_domain |
This is the root domain that you will use for your Smarter deployment. For example, if you want to access your Smarter instance at “platform.example.com”, then your root domain would be “example.com”. This value is used in both Terraform and Helm configurations, and it affects the naming of various resources such as DNS records and Hosted Zones. |
platform_name |
Default is “smarter”. Ensure that this matches in both Terraform and Helm configurations. Within the Smarter Platform application, the platform_name is derived from the root_domain by taking the first segment. For example, if your root domain is “example.com”, then the platform_name will be “example”. |
shared_resource_identifier |
Default is “platform”. Ensure that this matches in both Terraform and Helm configurations. Consider using a unique identifier such as your organization’s domain name or abbreviation to avoid naming ambiguities with other Smarter deployments in your AWS account. |
Environment |
One of “alpha”, “beta”, “next”, or “prod”. This is managed entirely inside the application, but affects the names of cloud resources including but not limited to DNS records and Hosted Zones that are created as part of normal platform operation. |
platform_region |
Default is “us”. Used exclusively inside of Terraform as part of naming high-level resources such as the EKS cluster, S3 buckets, SES resources, and more. Several environment variables in Helm are based on this value. |
These four organizational units are combined in various ways to create higher-level naming conventions for both cloud resources as well as application-level resources. Some examples:
Kubernetes namespaces are named using the convention
{platform_name}-{shared_resource_identifier}-{environment}which by default would be ‘smarter-platform-prod’.
S3 buckets are named using the convention
{environment}.{shared_resource_identifier}.{root_domain}which by default would be ‘alpha.platform.example.com’.
EKS clusters are named using the convention
{platform_name}-{shared_resource_identifier}-{platform_region}-{{unique_id}}which by default would be ‘smarter-platform-us-{{unique_id}}’.
k8s namespaces are named using the convention
{platform_name}-{shared_resource_identifier}-{environment}which by default would be ‘smarter-platform-prod’.
IAM roles are prefixed with
{platform_name}-{shared_resource_identifier}-{platform_region}which by default would be ‘smarter-platform-us’.
Within the Smarter application itself, these organizational units are combined to create higher-level organizational units. Examples:
environment_namespaces are named using the convention
{platform_name}-{shared_resource_identifier}-{environment}which by default would be ‘smarter-platform-prod’.
environment_platform_domain is named using the convention
{environment}.{shared_resource_identifier}.{root_domain}which by default would be ‘alpha.platform.example.com’.
CDN domains are named using the convention
cdn.{environment}.{shared_resource_identifier}.{root_domain}which by default would be ‘cdn.alpha.platform.example.com’.
API domains are named using the convention
{environment}.api.{shared_resource_identifier}.{root_domain}which by default would be ‘alpha.api.platform.example.com’.
Example Kubernetes Deployment
I. Infrastructure
The entire AWS infrastructure build is fully automated using Terraform and Terragrunt scripts. You should begin by reviewing the following documentation:
README at Smarter Infrastructure.
Makefile. This Makefile provides working shortcuts for all major operations. You should at least cursorily review these in order to ensure that you understand the basic intention of the Terraform scripts.
.env.example. The Terraform scripts in this repo use environment variables for all configuration values. You should not need to fork nor modify the code in this repo. The Makefile provides a shortcut for getting this setup correctly.
Note that this repo uses Terragrunt, a higher level wrapper around Terraform that provides an ability to manage multiple environments and multiple deployments with the same codebase. Make sure that you understand the basic principles of how Terragrunt works, and how it is being used in this repo, before proceeding.
Warning
Do not attempt to circumvent the official Terraform scripts. The cloud infrastructure is complex and has many interdependencies that would be difficult if not impossible to manage manually. Additionally, the Terraform scripts create a detailed set of resource tags that are the sole means of effectively tracking these resources inside your AWS account once they’ve been created.
II. ReactJS Component
The Chat functionality in the Smarter Prompt Engineer Workbench is delivered as a ReactJS component served from a CDN at runtime. You will need to build and deploy this component separately from the main Smarter Platform application. The source code of this component is mature and stable, and generally only changes in response to regular version bumps of a minimal set of dependencies. This component can safely run for months (or even years) without needing to be updated.
Note
The ReactJS component is designed to work generically with any web application. The Smarter Project manages @smarter.sh/ui-chat, an npm package that is published to the npm registry directly from the source code located in smarter-sh/smarter-chat.
While the @smarter.sh/ui-chat npm component is not used as part of this deployment process per se, it bears mentioning that it can be seamlessly integrated into any web architecture using the patterns described below in smarter-sh/web-integration-example, including Wordpress, Joomla, Drupal, Microsoft Sharepoint, .Net, Salesforce, Squarespace, Wix, Shopify, Angular, HubSpot, custom React applications, and more. The Smarter Web Console is just one arbitrary example of how to do this.
Setting this up for production is a 2-step process. First, you will use smarter-sh/smarter-chat to build and deploy the ReactJS component to your CDN (ie ‘cdn.platform.example.com/ui-chat’) which should have been automatically created for you by smarter-sh/smarter-infrastructure. Afterwards, you will use smarter-sh/web-integration-example to configure and deploy the app loader that Smarter uses to actually load the ReactJS component into the Web Console DOM. The app loader is a small JavaScript IIFE that is referenced in the Django template for the Web Console Prompt Engineer Workbench. It is served from the same CDN, and is responsible for adding elements to the web console DOM for the ReactJS component js and css build bundles.
See the script tag at the very bottom of the Django template below.
{% extends "dashboard/base.html" %}

{% block dashboard_content %}
  {{ block.super }}

  <!--
    react.js app entry point
    retrieve and inject the js/css artifacts of the react.js build into the DOM.
    example:
    <div
      id="smarter-sh-v1-ui-chat-root"
      class="smarter-chat"
      style="height: 88vh;"
      smarter-chatbot-api-url="https://openai.3141-5926-5359.alpha.api.smarter.sh/"
      smarter-toggle-metadata="True"
      smarter-csrf-cookie-name="csrftoken"
      smarter-session-cookie-name="session_key">
    </div>
  -->
  <section aria-label="Chat with your AI assistant" class="smarter-chat-section">
    <div
      id="{{ chatapp_workbench.div_id }}"
      class="smarter-chat"
      style="height: 88vh;"
      smarter-chatbot-api-url="{{ chatapp_workbench.chatbot_api_url }}"
      smarter-toggle-metadata="{{ chatapp_workbench.toggle_metadata }}"
      smarter-csrf-cookie-name="{{ chatapp_workbench.csrf_cookie_name }}"
      smarter-session-cookie-name="{{ chatapp_workbench.smarter_session_cookie_name }}"
      smarter-cookie-domain="{{ chatapp_workbench.cookie_domain }}"
      smarter-debug-mode="{{ chatapp_workbench.debug_mode }}"
      django-csrftoken="{{ csrf_token }}"
      django-session-cookie-name="{{ chatapp_workbench.django_session_cookie_name }}"
      >
    </div>
  </section>
  <!--
    retrieve and inject the js/css artifacts of the react.js build into the DOM.
    example:
    <script
      class="smarter-chat"
      async=""
      src="https://cdn.smarter.sh/ui-chat/app-loader.js">
    </script>
  -->
  <script class="smarter-chat" async="" src="{{ chatapp_workbench.app_loader_url }}" onerror="console.error('Failed to load:', this.src)"></script>

{% endblock %}
The rendered html template will include a script tag similar to the following that references the app-loader.js script.
<script
  async=""
  class="smarter-chat"
  src="https://cdn.platform.example.com/ui-chat/app-loader.js">
</script>
The IIFE in turn is responsible for adding these two elements to the DOM at run-time:
<head>
  <!-- ReactJS css production bundle ... -->
  <link
    rel="stylesheet"
    crossorigin=""
    href="https://cdn.platform.example.com/ui-chat/assets/main-DcfW1mPt.css"
    class="smarter-chat">
  <!-- more head elements ... -->
</head>
<body>
  <!-- ReactJS js production bundle ... -->
  <script
    class="smarter-chat"
    src="https://cdn.platform.example.com/ui-chat/assets/main-BHcMZHtf.js">
  </script>
  <!-- more body elements ... -->
</body>
The js bundle, itself an IIFE, will initiate the ReactJS bootstrap process to render
the Chat app into the DOM element with the id {{ chatapp_workbench.div_id }} which
by default will resolve to "smarter-sh-v1-ui-chat-root".
This is the root div for the ReactJS app,
and is where all of the React components will be rendered as children.
This div is rendered by the Django template engine from the template above,
and all of its attributes are generated from the context variable created in
ChatAppWorkbenchView.dispatch(). See below.
class ChatAppWorkbenchView(SmarterAuthenticatedNeverCachedWebView):
    """
    Chat app view for the Smarter web application.

    This view is responsible for serving the main chat application page within the Smarter dashboard web app.
    It integrates the ReactJS chat UI with the Django template system by injecting a React build artifact snippet
    (served from an AWS Cloudfront CDN) into the Django-rendered HTML template. The React app then takes over the UI
    from there.

    **Key Features:**

    - **Django Template Integration:**
      The view uses Django's template system to render the main chat page. It injects the React app's loader script
      and root div into the template, allowing seamless integration between Django and React.

    - **ReactJS UI Bootstrapping:**
      The React build (JavaScript and CSS) is loaded from a CDN and injected into the DOM. The React app is responsible
      for rendering the interactive chat UI after the initial page load.

    - **Flexible URL Patterns:**
      The view supports both sandbox and production URL formats, allowing it to work with deployed and not-yet-deployed ChatBots.

    - **Authentication Protected:**
      This view requires the user to be authenticated. If the user is not authenticated, access is denied.

    - **Cache Control:**
      The view uses Django's `never_cache` decorator to ensure that the browser does not cache the chat page itself.
      This prevents issues where a user logs out and then logs back in without a full page refresh.

    **Example Usage:**

        Sandbox mode:
            - http://smarter.sh/workbench/hr/
            - http://127.0.0.1:9357/workbench/<str:name>/

        Production mode:
            - https://hr.3141-5926-5359.alpha.api.example.com/workbench/

    **Returns:**
        Renders the Django template for the chat app, injecting the React loader and configuration context.

    **See Also:**
        - `ChatConfigView` — for the endpoint that provides configuration data to the React app.
    """

    template_path = "prompt/workbench.html"

    # The React app originates from
    #  - https://github.com/smarter-sh/smarter-chat and
    #  - https://github.com/smarter-sh/web-integration-example
    # and is built-deployed to AWS Cloudfront. The React app is loaded from
    # a url like: https://cdn.alpha.platform.smarter.sh/ui-chat/index.html
    reactjs_cdn_path = smarter_settings.smarter_reactjs_app_loader_path
    reactjs_loader_url = smarter_settings.smarter_reactjs_app_loader_url

    chatbot: Optional[ChatBot] = None
    chatbot_helper: Optional[ChatBotHelper] = None

    def dispatch(self, request: HttpRequest, *args, **kwargs):
        """
        Dispatch method to handle the request for the main chat application page.

        This method is responsible for preparing and serving the Django template that bootstraps the ReactJS chat UI
        within the Smarter dashboard web app. It injects the React loader script and configuration context into the
        template, enabling seamless integration between Django and React.

        **Key Features:**

        - **Django Template Integration:**
          Uses Django's template system to render the main chat page, injecting the React app's loader script and root div.

        - **ReactJS UI Bootstrapping:**
          Loads the React build (JavaScript and CSS) from a CDN and injects it into the DOM. The React app then takes over
          rendering the interactive chat UI after the initial page load.

        - **Flexible URL Patterns:**
          Supports both sandbox and production URL formats, allowing the view to work with both deployed and not-yet-deployed ChatBots.

        - **Authentication Protected:**
          Requires the user to be authenticated. If the user is not authenticated, access is denied.

        - **Cache Control:**
          Uses Django's `never_cache` decorator to prevent the browser from caching the chat page, ensuring session security.

        Parameters
        ----------
        request : HttpRequest
            The incoming HTTP request object.
        *args
            Additional positional arguments.
        **kwargs
            Additional keyword arguments.

        Returns
        -------
        HttpResponse
            Renders the Django template for the chat app, injecting the React loader and configuration context.

        See Also
        --------
        ChatConfigView : The endpoint that provides configuration data to the React app.
        """
        if not self.user_profile:
            logger.error(
                "%s.dispatch() - user_profile is None. This should not happen. Returning 403.",
                self.formatted_class_name,
            )
            return SmarterHttpResponseForbidden(request=request, error_message="Authentication required")
        retval = super().dispatch(request, *args, **kwargs)
        if retval.status_code >= HTTPStatus.BAD_REQUEST:
            return retval

        session_key = kwargs.pop(SMARTER_CHAT_SESSION_KEY_NAME, None)
        if session_key is not None:
            self._session_key = session_key
            verbose_logger.debug(
                "%s.dispatch() - setting session_key=%s from kwargs",
                self.formatted_class_name,
                self.session_key,
            )

        try:
            verbose_logger.debug(
                "%s.dispatch() - url=%s, account=%s, user=%s",
                self.formatted_class_name,
                self.url,
                self.account,
                self.user_profile.user,
            )
            # first try to avoid some quite-expensive steps by looking for the chatbot
            # in the cache based on the request.
            self.chatbot = get_cached_chatbot_by_request(request=self.smarter_request)
            if not self.chatbot:
                self.chatbot_helper = ChatBotHelper(
                    request=self.smarter_request,
                    session_key=self.session_key,
                    account=self.account,
                    user=self.user,
                    user_profile=self.user_profile,
                )
                self.chatbot = self.chatbot_helper.chatbot if self.chatbot_helper.chatbot else None
            if self.chatbot:
                verbose_logger.debug(
                    "%s.dispatch() - set chatbot=%s from self.chatbot_helper",
                    self.formatted_class_name,
                    self.chatbot,
                )
            else:
                return SmarterHttpResponseNotFound(request=request, error_message="ChatBot not found")
        except ChatBot.DoesNotExist:
            return SmarterHttpResponseNotFound(request=request, error_message="ChatBot not found")
        # pylint: disable=broad-except
        except Exception as e:
            logger.error(
                "%s.dispatch() - Exception occurred while getting chatbot: %s. "
                "Request URL: %s, Session Key: %s\nStack trace: %s",
                self.formatted_class_name,
                str(e),
                request.build_absolute_uri(),
                self.session_key,
                traceback.format_exc(),
            )
            return SmarterHttpResponseServerError(request=request, error_message=str(e))

        if not self.chatbot:
            return SmarterHttpResponseNotFound(request=request, error_message="ChatBot not found")

        # the basic idea is to pass the names of the necessary cookies to the React app, and then
        # it is supposed to find and read the cookies to get the chat session key, csrf token, etc.
        context = {
            "chatapp_workbench": {
                "div_id": smarter_settings.smarter_reactjs_root_div_id,
                "app_loader_url": self.reactjs_loader_url,
                "chatbot_api_url": self.chatbot.sandbox_url,
                "toggle_metadata": True,
                "csrf_cookie_name": settings.CSRF_COOKIE_NAME,
                "smarter_session_cookie_name": SMARTER_CHAT_SESSION_KEY_NAME,  # this is the Smarter chat session, not the Django session.
                "django_session_cookie_name": settings.SESSION_COOKIE_NAME,  # this is the Django session.
                "cookie_domain": settings.SESSION_COOKIE_DOMAIN,
                "debug_mode": waffle.switch_is_active(SmarterWaffleSwitches.ENABLE_REACTAPP_DEBUG_MODE),
            }
        }
        verbose_logger.debug(
            "%s.dispatch() - rendering template %s with context: %s",
            self.formatted_class_name,
            self.template_path,
            formatted_json(context),
        )
        return render(request=request, template_name=self.template_path, context=context)
The rendered div will look something like the following.
<div
  id="smarter-sh-v1-ui-chat-root"
  class="smarter-chat"
  django-csrftoken="yuxiPHpWd2bChk03K5mxmPBfauI2occ6Gcy7526Uv9iKuaLy0EEB8wI6pQM5aYjv"
  django-session-cookie-name="sessionid"
  smarter-chatbot-api-url="https://platform.example.com/api/v1/chatbots/4/"
  smarter-cookie-domain="platform.example.com"
  smarter-csrf-cookie-name="csrftoken"
  smarter-debug-mode="True"
  smarter-session-cookie-name="session_key"
  smarter-toggle-metadata="True"
  style="height: 88vh;">
</div>
Important
The attribute value of id (‘smarter-sh-v1-ui-chat-root’ by default) must agree with the value of
REACT_ROOT_ELEMENT_ID in web-integration-example/src/shared/constants.js
(‘smarter-sh-v1-ui-chat-root’ unless you have modified it) as this is the
‘root’ element id that the IIFE in the React bundle will look for.
Smarter Chat Additional documentation:
README at smarter-sh/smarter-chat.
Makefile. This Makefile provides working shortcuts for all major operations. Importantly, The deployment process is fully automated and can be completed with a single command.
Smarter Web Integration Example Additional documentation:
README at smarter-sh/web-integration-example.
Makefile. This Makefile provides working shortcuts for all major operations. Importantly, The deployment process is fully automated and can be completed with a single command.
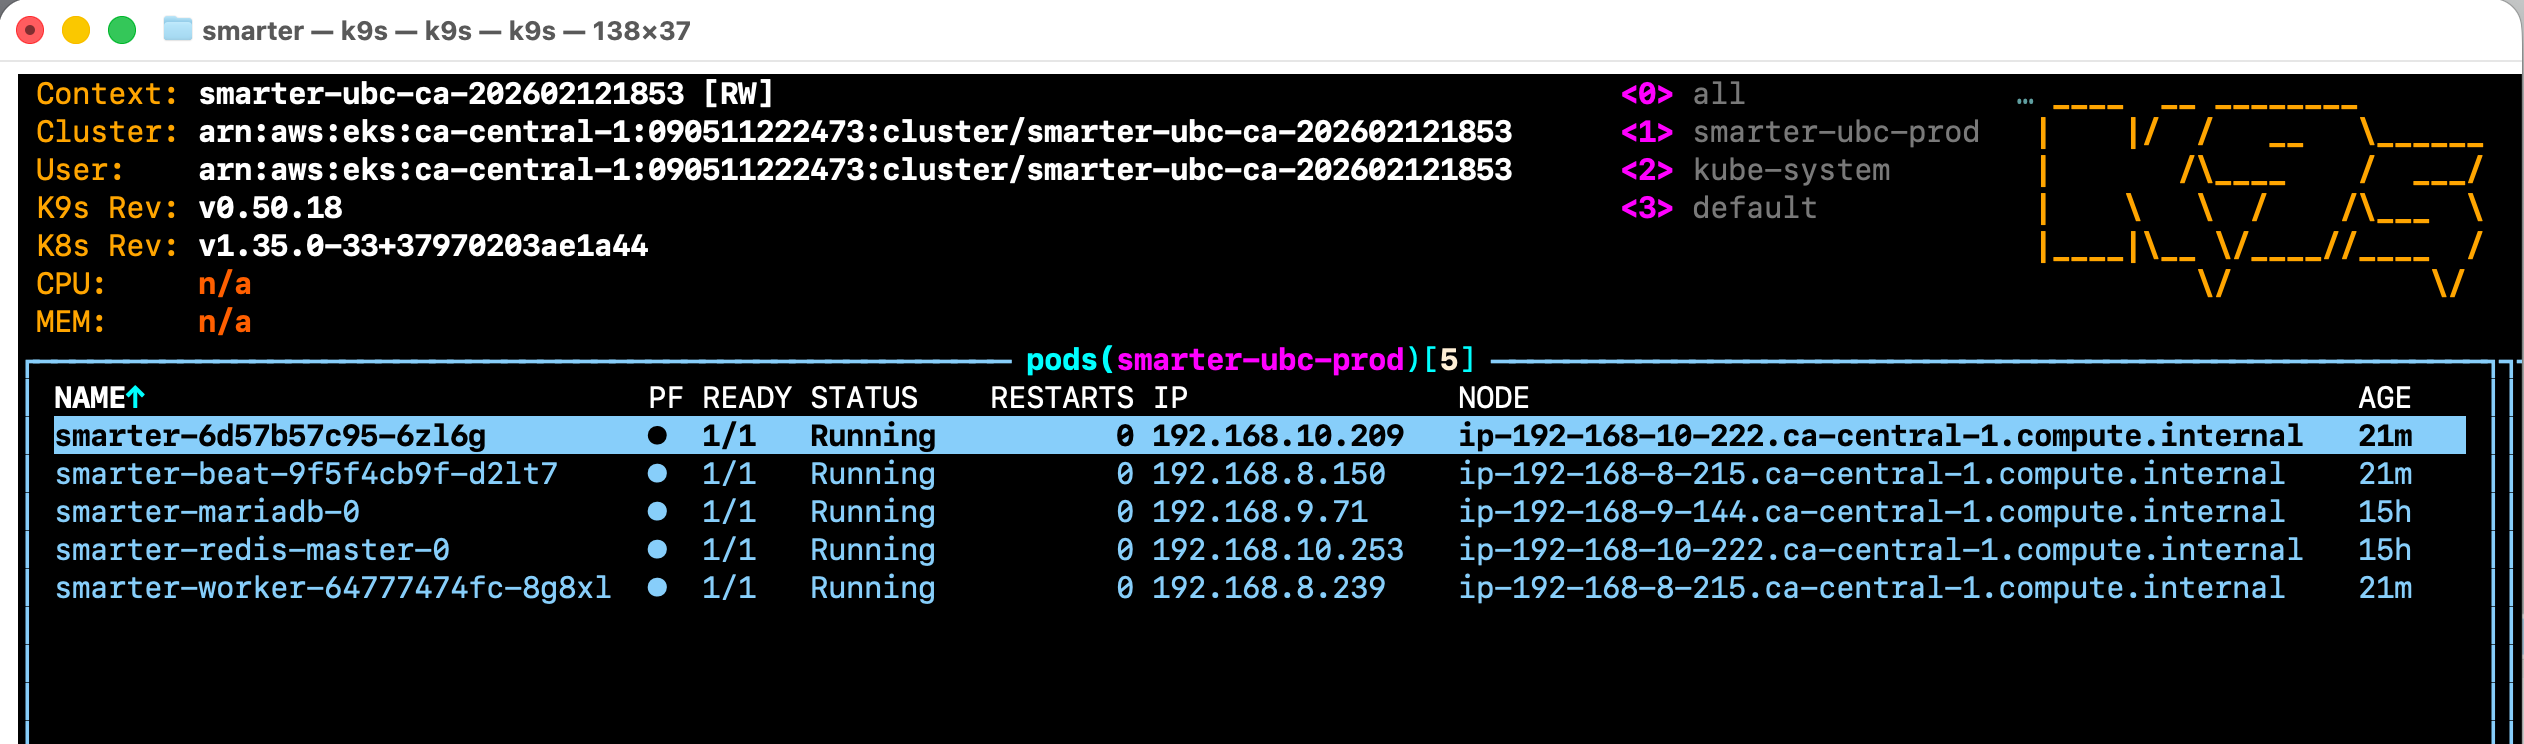
III. Smarter Platform Application
The Smarter Platform application is deployed to Kubernetes using the official Helm chart. The application itself consists of a Python-Django backend that supports an API and a Web Console frontend. This single code base is deployed to Kubernetes as an application server and also as a Celery worker and a Celery Beat worker. The application follows 12-factor app principles and is designed to be horizontally scalable and resilient to failure.
In most cases, you can deploy the Smarter Platform application using the official Helm chart with minimal configuration. However, you can optionally build and deploy from source, though this is out of the scope of this documentation.
Begin by reviewing the following documentation:
README at Official Smarter Helm chart.
Values.yaml. This file contains the comprehensive set of configuration values for the Helm chart. These cover not only configuration of the application itself, but also all backing services and deployment options. Note that there are multiple options for the Database backend, including pod-based Mysql and MariaDB, and remote AWS RDS.
(Optional) Source code. You might find some of the source code helpful for understanding how to configure the application. Of interest are the Django settings files, the Smarter Settings module, the Smarter Settings documentation, the Python requirements, and the Dockerfile.
Important
1. You will need to create your own Deployment workflow. You can use the Smarter GitHub Actions Deployment workflow and Smarter GitHub Deployment Action in the official Smarter repo as a reference, but you should not attempt to use it directly unless you have forked the Smarter repo. The deployment workflow depends on a number GitHub Secrets that you must configure in your own GitHub repository. If possible, see Smarter Settings - Secrets.
2. You will need an AWS IAM key-pair with sufficient permissions to deploy the application to your Kubernetes cluster. At a minimum, this key-pair will need complete control of the EKS service, in addition to permissions to create and manage the various resources that the application depends on such as EC2 instances, EBS volumes, S3 buckets, SES resources, and more.
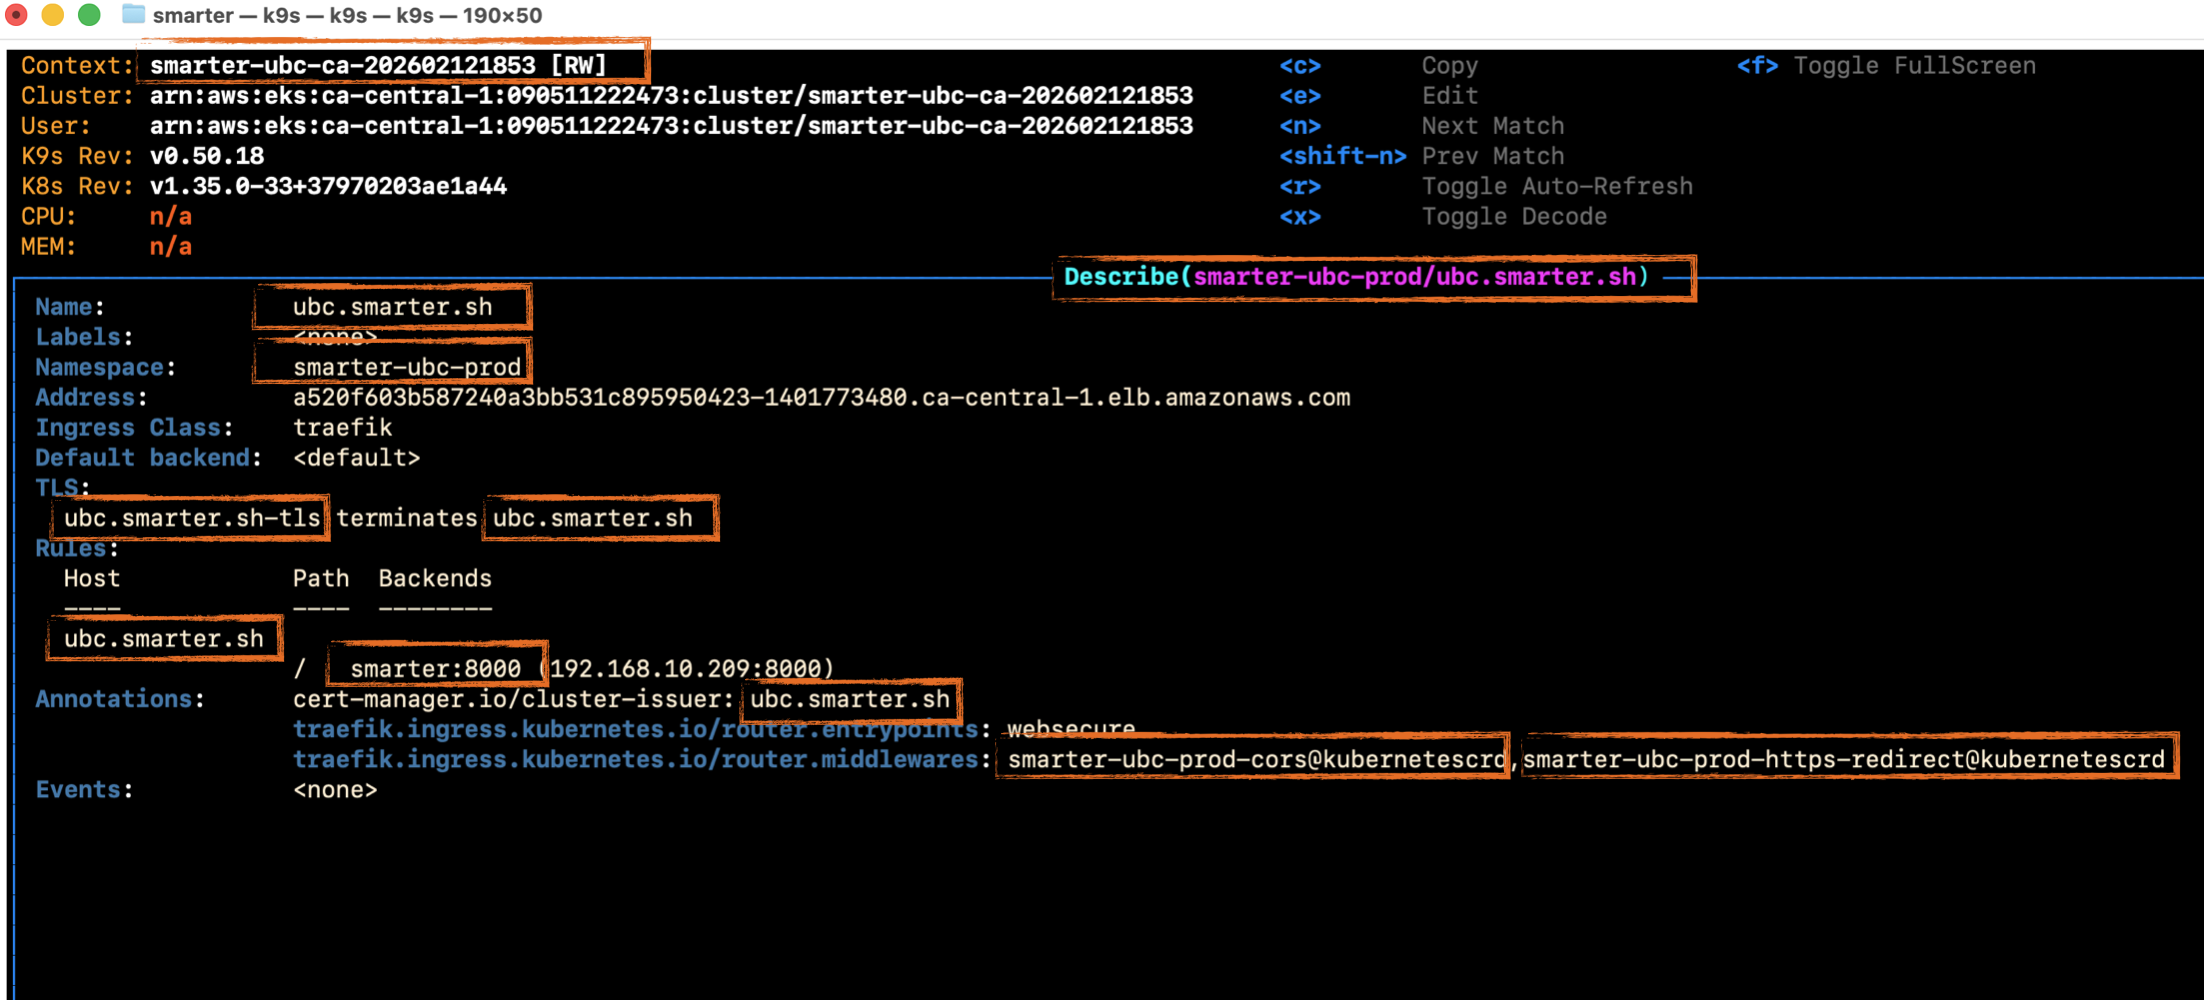
Trouble Shooting
Permissions and naming are the two most common sources of deployment-related problems. Consider the example Kubernetes Ingress manifest below. It contains eleven references, created by either of Terraform or the Smarter Platform application itself. These names have to agree, and must be able to “hand shake” as necessary between Kubernetes and the Smarter Platform application.